Monday 30 December 2013

Hide Quick Launch in Sharepoint 2013


         Earlier in my post , http://prasath04sharepoint.blogspot.in/2013/05/hide-top-bar-ribbon-quick-launch-in.html we had took a look on hiding quick launch controls in sharepoint 2010. Unfortunately this method doesn't work with Sharepoint 2013.

For hiding quick launch at Sharepoint 2013 we have to use different css.

To hide only Quick Launch Panel from the view

Add the following css code in the Application Page under PlaceHolderMain section.

<style type="text/css">
 #sideNavBox {DISPLAY: none}
 #contentBox {MARGIN-LEFT: 5px}
</style>

Tuesday 17 December 2013

Get Current User Email by sharepoint 2013 Object Model


Hi,


   Here we will write sharepoint 2013 object model code to retrieve current user email id. 
Use the following code.

string strUserName = HttpContext.Current.User.Identity.Name.ToString();

string strEmail = SPContext.Current.Web.AllUsers[strUserName].Email;

First we will retrieve the user name and then we will retrieve the email id.

Automation of Reports(Send reports as mail regularly)


Hi,


    I was always wondering weather i could automate reports in Sharepoint. My idea is, rather than viewing the reports from sharepoint site what if i get a daily reports by mail ? Here is the procedure on how to configure to get a daily reports via mail.

For this purpose you need a working report in shareopint site.

Choose , Microsoft SQL Server 2008 r2 à  Configuration Tools à Reporting Service Configuration Manager


The Reporting Service Configuration Connection opens up. Ensure correct Server  Name and Report Server Instance and click Connect.


Choose E-mail Settings and provide your outgoing mail address and your server name. Click Apply and save changes.


Now point dropdown at your report and choose "Manage Subscriptions".


Click on Add Subscription.


On the To Section provide the mail address for whom the report has to be sent as mail. Also you can configure appropriate time during which the report will be delivered. In Report Contents section you can also choose the format that you wish to deliver the report(PDF, World, Excel, MHTML etc..,). Click ok and you can find the subscription is added to the report and is available.


This will deliver the report as mail to the particular mail id that was mentioned.


Monday 16 December 2013

Different types in Updating Sharepoint List


            While creating Event Receivers or Workflows we need to update the list or list items using SPListItem method. However there are different types in updating. Most commonly used are Update and SystemUpdate. lets see the different types of updates and its use.


Update()


  • Updates the item in the database.
  • Updates the “Modified” and “Modified by” values.
  • Creates a new version.

Systemupdate()


  • Updates the item in the database(List).
  • Does not update build in columns "Modified" and "Modified By".
  • Does not increment item version.
  • Triggers the item events.

Systemupdate(true)


  • Updates data to database(List).
  • Does not update build in columns "Modified" and "Modified By".
  • Will increment Item Version.

Systemupdate(false)


  • Updates data to database.
  • Does not update build in columns "Modified" and "Modified By".
  • Does not increment item version.

UpdateOverwriteVersion()


  • Updates data to database.
  • Updates build in columns "Modified" and "Modified By".
  • Does not increment new version.

Note :


You can also disable the triggering of events by using “this.EventFiringEnabled = false;”. Do your update and enable the events again with “this.EventFiringEnabled = true;”

Friday 27 September 2013

PowerShell script to delete all items in a List


Deleting items from your list can be done in a easier way using the shell script. 
This is much easier when compared to deleting items from the browser. 

1) Copy & paste the following script in a notepad. 

2) Provide your site name mentioned at $SITEURL = "http://your server"

3) Provide your list name as it in browser mentioned at $oList = $web.Lists["Your List"];

4) Run Sharepoint 2010 Management Shell as administrator.

5) Copy paste the script from notepad and press enter.

6) Now all the items at particular list will be deleted.


$SITEURL = "http://your server"

$site = new-object Microsoft.SharePoint.SPSite ( $SITEURL )
$web = $site.OpenWeb()
"Web is : " + $web.Title

$oList = $web.Lists["Your List"];

"List is :" + $oList.Title + " with item count " + $oList.ItemCount

$collListItems = $oList.Items;
$count = $collListItems.Count - 1

for($intIndex = $count; $intIndex -gt -1; $intIndex--)
{
        "Deleting : " + $intIndex
        $collListItems.Delete($intIndex);
}


Tuesday 24 September 2013

SharePoint 2010 - "Unable to display this Web Part"


                                  I was using web parts in a page and i had faced this problem. It was telling that "Unable to Display this web part. To trouble shoot the problem, open this Web Page in Microsoft Sharepoint Foundation - compatible HTML editor such as Microsoft Sharepoint Designer. If the problem persists contact your web server administrator. Corelation ID : 7acacbd8...  "


                                 When i look in the error log using the Correlation ID, I get this.


Error while executing web part: System.StackOverflowException: Operation caused a stack overflow.     at Microsoft.Xslt.NativeMethod.CheckForSufficientStack()     at <xsl:template match="FieldRef[@Name='Author']" name="FieldRef_header.Author" mode="header">(XmlQueryRuntime , XPathNavigator , Double )     at <xsl:template match="View" mode="full">(XmlQueryRuntime , XPathNavigator , String )     at <xsl:template match="View" name="View_Default_RootTemplate" mode="RootTemplate">(XmlQueryRuntime , XPathNavigator , String )     at <xsl:template match="/">(XmlQueryRuntime )     at Root(XmlQueryRuntime )     at System.Xml.Xsl.XmlILCommand.Execute(Object defaultDocument, XmlResolver dataSources, XsltArgumentList argumentList, XmlWriter writer, Boolean closeWriter)     at System.Xml.Xsl.XmlILComman...        7acacbd8-e819-4018-ae84-1900dd9c10e4


                               It tells me that stack over flow exception has occurred. Now when i refresh the page for the second time the web part works fine for me. The problem is only when the page is initially loaded.

                              The problem is a XSLT extension method taking long time to complete. in SP2010 SP1 the SharePoint team introduced a check in the XSLT Transformations done by data from web part and thereby in search core results webpart, that the latest extension method has to complete within 1 second of the first being invoked otherwise they throw StackOverflow Exception. The solution is changing the duration of the webparts in all forms available from 1 second to 5 seconds. To do so follow the method.

1) Locate Sharepoint 2010 Management Shell 

2) Paste the following script and enter

$farm = Get-SPFarm 
$farm.XsltTransformTimeOut = 5 
$farm.Update()

This will change the timeout from 1 second to 5 seconds which gets us some time so that StackOverflow Exception wont occur.


Sunday 15 September 2013

Check if list exists using TryGetList method in SharePoint 2010


Now lets see how to check if list exists using TryGetList method in SharePoint.

Normally we will be using 

SPList list = web.Lists[listName]; 

to get a list.

But, it throws a null reference error if the list is not there(i.e., in case if it is being deleted from the site using browser). So we will be looping through the SPListItemCollection object and check if the list exists or would go for exception. In SharePoint 2010, a new method "TryGetList" is implemented to get the list and check if the list exists. Lets see how the code works out.


using (SPSite site = new SPSite("http://serverName:1234/"))
{
  using (SPWeb web = site.RootWeb)
     {
        SPList list = web.Lists.TryGetList("My List");
        if (list != null)
        {
          Console.WriteLine("List exists in the site");
        }
        else        

        {
          Console.WriteLine("List does not exist in the site");
        }
          Console.ReadLine();
     }
}

Tuesday 13 August 2013

Sharepoint - dispform.aspx, hide button in ribbon bar


1. The ribbon bar in dispform contains some buttons. They might not need in some places due to permissions. They can be hided using javascript.


2. Use IE. Right click on the dispform and choose view source.


3. In the source we can find the end user id of the particular button
    ex.1) Ribbon.ListForm.Display.Manage.EditItem-Large is for "Edit Item"
         2) Ribbon.ListForm.Display.Manage.VersionHistory-Medium is for "Version History" etc.

    -- Choose the appropriate id of the button that you wish to hide.


4. Use this script
       <script type="text/javascript">
    function hideEdit() {
        var edit = document.getElementById("Ribbon.ListForm.Display.Manage.EditItem-Large");
        edit.style.display = "none";
    }       
    _spBodyOnLoadFunctionNames.push("hideEdit");
</script>

         -- Use individual functions for buttons that you wish to hide.
         -- don't forget to call it using _spBodyOnLoadFunctionNames.

5. On the dispform move to page edit.


6. Click Add Web part and insert content editor web part.
     

7. Click on "click here to add new content".

8. On format text ribbon choose edit html source.


9. Paste the script inside the dialog box and click ok.


10. Now edit the web part and make it hidden.


Saturday 1 June 2013

Expand and Collapse the SharePoint Web parts


                                               Consider a SharePoint page containing more web parts. Given that a condition like  the web parts must be able to expand and collapse. Though the web parts contains minimize option, the following methods could be used that is considered as more user friendly.

1. Click on the Edit page Under "Site Actions".

2.Add Content Editor Web part any Zone.


3.Click on the Web part. "Click here to add content"


4.Click On "Edit Html Source" on the Ribbon.


5.Add following code.


<script type="text/javascript">
// Add the Web Part Titles here to have them opened by default
var wpsToSkip = ['Search Documents','sandbox'];
 //Add multiple Web parts to skip the Collapse
//var wpsToSkip = ['Search Documents','Pending Documents','sandbox'];


function wpExpander() {
 var theTDs = document.getElementsByTagName("TD");
 for (var t=0;t<theTDs.length;t++) {
  var id = theTDs[t].id;
  if (id.match("WebPartTitleWPQ")) {
   id = id.substr(id.indexOf("WPQ"));
   var title = (theTDs[t].innerText || theTDs[t].textContent).replace(/[\n\r]/,'');
   var strImg = "<img style='margin:6px 5px 0px 2px;cursor:hand;float:left;' ";
   if (wpsToSkip.join().match(title)) {
    strImg += "onClick='showHide(\""+id+"\",this)' src='/_layouts/images/minus.gif'>";
   } else {
    strImg += "onClick='showHide(\""+id+"\",this)' src='/_layouts/images/plus.gif'>";
    document.getElementById("WebPart"+id).style.display = "none";
   }
   theTDs[t].innerHTML = strImg + theTDs[t].innerHTML;
  }
 }
}


function showHide(i,o) {
 var wp = document.getElementById("WebPart"+i);
 wp.style.display = (wp.style.display=="") ? "none" : "";
 o.src = (o.src.match(/plus.gif/)) ? "/_layouts/images/minus.gif" : "/_layouts/images/plus.gif";
}


_spBodyOnLoadFunctionNames.push("wpExpander()");
</script>


6.Make this Web part as Hidden.


7.Save and Close the web part.

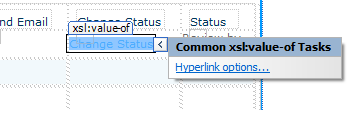
Change hyperlink to image in SharePoint


On a specific site page or page where you have the view

1. Click on the link in the view to follow the hyperlink ( > appears)


2. Click on “Hyperlink options


3.Click OK


4. It changes to the actual URL 


5. In the code view, the source code is now 

</xsl:when>

                            <xsl:otherwise>
              <a href="{$url}"><xsl:value-of select="$url" /><xsl:value-of select="$desc" /></a>
            </xsl:otherwise>

6.Replace the <a href="{$url}"><xsl:value-of select="$url" /><xsl:value-of select="$desc" /></a> 


with 


<a href="{$url}"><img alt=" Status" src="../SiteAssets/icons/tickmark.png" /></a>


Friday 31 May 2013

Change the Web URL from Alternate Access Mappings using C#


There are many types of Zones available in the SharePoint access mappings.
  • Default
  • Intranet
  • Extranet
  • Internet
  • Custom 

Using this code you can change the alternate access mappings from Default to Internet.


            string webUrl = string.Empty;
            using (SPWeb web = workflowProperties.Site.RootWeb)
            {
                using (SPSite site = web.Site)
                {
                    foreach (Microsoft.SharePoint.Administration.SPAlternateUrl altUrl in site.WebApplication.AlternateUrls)
                    {
                        if (altUrl.UrlZone == Microsoft.SharePoint.Administration.SPUrlZone.Internet)
                            webUrl = altUrl.IncomingUrl .ToString() + site.ServerRelativeUrl.ToString();
                        //fullweburl = webUrl + site.ServerRelativeUrl.ToString();
                    }
                }
            }

Monday 27 May 2013

Procedures for Creating XSLT Web part in a Page


1) Add a new web part zone found in ribbon using the Sharepoint Designer

2) On Insert ribbon you can find DataView dropdown Click and add Empty Data View

3) Now You can find a empty data view is added to the web part zone.

4) In the Empty Data view You can find Click Here to select a Data Source link available. Click it and choose the source of the data from which you wanted to add details Either List or Library.

5) Now on the Data Source details available on the right bottom corner you can find a button named "Insert Selected Field as.."
Click on it and weather you want to add single Item View or Multiple Item View.

6) Now on the Ribbon available on Options you can find Add/Remove Columns button. Click that.

7) Edit Columns popup will be available and you can find 2 sets of fields were available 

i) Available fields and

ii) Displayed Columns

8) Delete all the fields available in the Displayed Columns and Choose the fields you required from the available fields.


9) Click ok and you can see all the chosen fields available with the XSLT Web part.

Friday 24 May 2013

Set or Get value people editor control in SharePoint with C#


Get People Editor Values


This code demostrate how to get people editor control values and insert a sharepoint list or document library.


SPWeb mySite = SPContext.Current.Web;
SPListItemCollection listItems = mySite.Lists["myList"].Items;

SPListItem item = listItems.Add();

item["Title"] = this.txtTitle.Text.ToString();
item["Location"] = this.lblLocations.Text.ToString();
item["EventDate"] = txtStart.SelectedDate ;

string[] UsersSeperated = pplEditor.CommaSeparatedAccounts.Split(',');
SPFieldUserValueCollection UserCollection = newSPFieldUserValueCollection();
foreach (string UserSeperated in UsersSeperated)
   {
    mySite.EnsureUser(UserSeperated);
    SPUser User = mySite.SiteUsers[UserSeperated];
    SPFieldUserValue UserName = new SPFieldUserValue(mySite, User.ID,                 User.LoginName);
    UserCollection.Add(UserName);
   }
item["people"] = UserCollection;
item.Update();


Set People Editor values from Sharepoint List or library


This code demostrate how to set people editor control values from  a sharepoint list


SPSite site = SPContext.Current.Site;
SPWeb myweb = site.OpenWeb();
SPList mylist = myweb.Lists["MyList"];
SPQuery query = new SPQuery();
query.Query = "<Where><Eq><FieldRef Name='ID'/>" +
              "<Value Type='Text'>" + e.Value.ToString() + "</Value></Eq></Where>";

SPListItemCollection items = mylist.GetItems(query);
  foreach (SPListItem item in items)
    {

     try
      {

        this.txtTitle.Text = item["Title"].ToString();
        this.txtStart.SelectedDate =Convert.ToDateTime(item["EventDate"].ToString());
       }
        catch (Exception ex)
       {
         Response.Write(ex.Message.ToString());
       }


ArrayList _arrayList = new ArrayList();
SPFieldUserValueCollection users = item["People"asSPFieldUserValueCollection;
  if (users != null)
     {
       foreach (SPFieldUserValue user in users)
         {

          PickerEntity _pickerEntity = new PickerEntity(); // PickerEntitiy use using Microsoft.SharePoint.WebControls
          _pickerEntity.Key = user.User.LoginName;
          _pickerEntity.IsResolved = true;
          _arrayList.Add(_pickerEntity);
          }
        pplEditor.UpdateEntities(_arrayList);

      }
}  


Hide Top Bar, Ribbon, Quick Launch in SharePoint 2010

Top Bar, Ribbon, Quick Launch are come up with Application Pages by default. This could be done by using css.

Simple, Just add the below css Code in Application Page under PlaceHolderMain section.
<style type="text/css">
    #s4-ribbonrow.ms-cui-topBar2.s4-notdlg.s4-pr s4-ribbonrowhidetitle.s4-notdlg noindex#ms-cui-ribbonTopBars#s4-titlerow#s4-pr s4-notdlg s4-titlerowhidetitle#s4-leftpanel-content {display:none !important;}
    .s4-ca{margin-left:0px !importantmargin-right:0px !important;}
</style>
This will hide the elements and only the content will be shown.

To hide only Quick Launch Panel from the view

Add the following css code in the Application Page under PlaceHolderMain section.

<style type="text/css">
#s4-leftpanel{
display:none
}
.s4-ca{
margin-left:0px
}
</style>

Related article,

Hide quick launch at Sharepoint 2013

http://prasath04sharepoint.blogspot.in/2013/12/hide-quick-launch-in-sharepoint-2013.html